Photoshoot: President D. D. Bouterse of Suriname
It’s not every day that you get asked to shoot the official portrait of the president of your country, or any other country for that matter 
They gave me a few hours to think about it and in the end I decided to do it. What was just another quiet Sunday became a day to start worrying about how I would do this photoshoot. The next day I went to check out the location at the presidential cabinet office where I’d have to do the photoshoot, and I decided to do it in one of the larger conference rooms. Meanwhile the date of the photoshoot had been decided and it would have to be done on the coming Friday which was just four days away. I didn’t know how I would do the photoshoot yet, but I did know that I wanted to do something a little different.
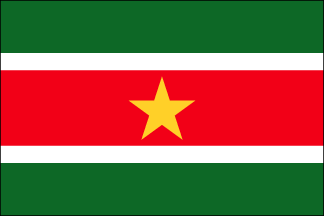
As I was thinking about various ideas I decided that I wanted to do something with the colors of the flag of Suriname as the main theme. As you may know the colors in the flag all have their own meaning (Wikipedia: English and Dutch). I thought about using a red or green background and ultimately went with red. The reason why I went with red was because if you look at the flag of Suriname, you can see that there’s a yellow star in the red area. So since the president would be standing in front of the red background, I could light him with yellow light and then he could be the yellow star in the flag.
Now I had another problem and that was that I couldn’t just completely light the president with yellow light. Obviously that would make him look very strange. I quickly decided that I would have to rim-light him with yellow light. Not only would it then add some more meaning to the picture (meaning of the yellow color in the flag) but the yellow light would also help to separate the president from the background. But then I thought what if the yellow light would come from above? Obviously that could add some more meaning to the picture in a spiritual sense. During his campaign the president often talked about how his campaign and the formation of the current coalition was being directed by an invisible hand, and how a higher power was guiding the process of change in politics in Suriname, and I thought making the light come from above would make sense in that regard. By carefully positioning the flash I could also make the yellow light fall on just his head and shoulders.
And finally the president himself would be lit with a medium sized softbox on one side and a reflector on the other side. Two days before the photoshoot I experimented with the setup at home to see if I’d be able to pull it off and what equipment I would have to bring with me on location. Even for such a simple setup, planning and rehearsing is absolutely necessary to make sure you’re prepared and can make the most of out the short period of time you’ll be able to work with the subject. Once I was confident everything would work, I packed all the equipment I needed for the photoshoot.
On the day of the photoshoot I arrived on location an hour and a half before we were expecting the president. I had purposely planned it that way to allow for enough time for me to set up everything and test the lighting again before the president arrived. I knew that he would be very busy and I wouldn’t have time to fool around with the equipment while keeping him waiting. In fact, as I was setting up a TV crew was also preparing to set up their equipment in the same room and as soon as I was finished he sat down with them for their interview. That’s how tight his schedule was. So anyway, I’m glad I got on location an hour and a half earlier, it proved to have been just enough time to get access to the location, unpack, set up the equipment and test the lighting and have about 20 minutes to relax and wait for the president.
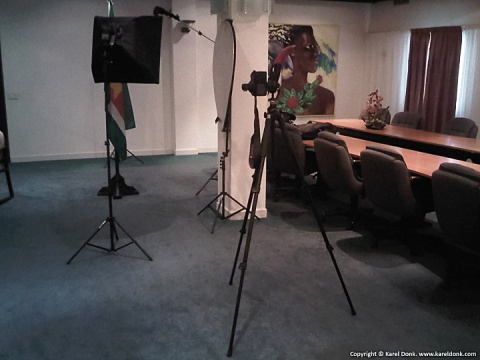
In the picture below, taken with my mobile phone, you can see how everything was set up.
As you can see there was no red background material, I decided to “paint” the white wall red by just placing a red gel on the background light (a Canon Speedlite 580 EX II). The distance between the subject and the wall is also big to make sure the wall would be out of focus and appear to be smooth in the pictures and also to minimize spill light from the softbox. I also didn’t use the tripod during the actual shoot with the president, it was easier to hold the camera and have the freedom to make quick changes in positioning and framing.
I used the Canon EF 50mm f/1.2L lens for this shoot. I had the 35mm f/1.4 and 85mm f/1.2 with me, but I found that the 50mm gave me the best framing at my preferred working distance on the EOS 40D body. Before you write in to me mentioning how I bashed the 50mm f/1.2 lens before here on my blog and ask why I keep using it, let me say that, yes, the focusing issues this lens is known for were present, but that at f/5.6 the focusing errors are not very noticeable in the pictures that have them due to the larger depth of field (depending on the picture and subject). Not only does this lens backfocus, but it also is very inconsistent when using autofocus. You can place the camera on a tripod in a completely static scene with a subject that is completely still and autofocus 3 times on the subject and get a slightly different focus plane each time (a slight difference that’s not so slight at f/1.2. The 85mm f/1.2 lens is very consistent in comparison.) So I shot many extra frames to make sure I’d have pictures where the focus was just right. I guess we can only thank Canon for this marvelous $1600 piece of engineering. And I hope you realize I’m being sarcastic here.
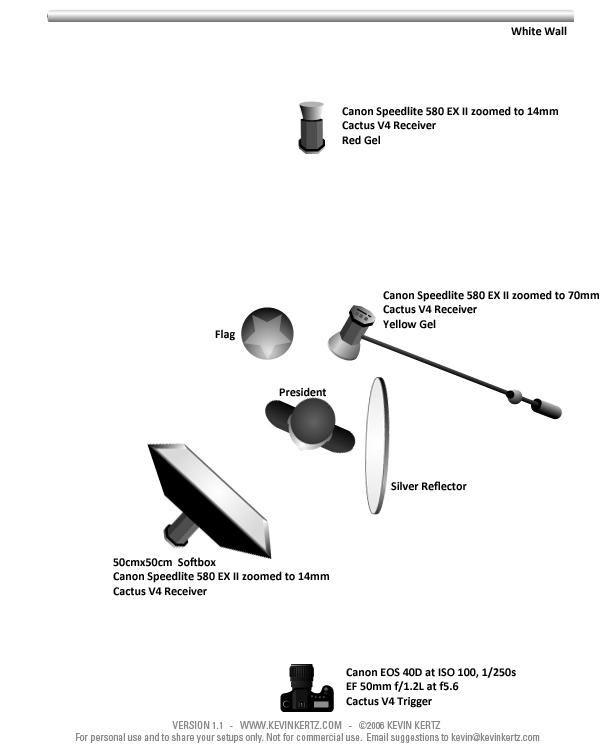
I’ve included a lighting diagram below where you can also see the equipment I used and some of the settings. You’ll note that I used a Cactus V4 wireless trigger and receivers to trigger the Canon Speedlites. I didn’t use the Canon ST-E2 because quite frankly it can be a pain in the ass to have to make sure every time that the infrared sensors on all the flashes are within line of sight with the ST-E2 trigger. And in this case the background light would be behind the subject so there would be no way for me to maintain line of sight with it. You would have thought that by now Canon would have already worked on a wireless flash solution based on a more reliable radio frequency technology. Fake Chuck recently wrote about this too, and one can only hope that Canon updates the old and overly expensive ST-E2 sometime soon with technology that’s worthy of the 21st century.
The gels I used on the Speedlites were from the Rosco Strobist collection (very nice set). In the picture below you can see just the effect the yellow light had on the picture. The background and key light were turned off. Here I was trying to position the president in such a way that the light fell on his head and shoulders the way I wanted. I had to ask him to step back and sideways a few centimeters a couple of times.
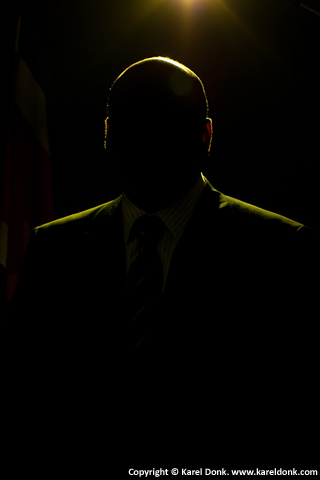
Test shot with just the yellow light on top
And in the following picture taken after setting everything up you can see the effect that just the red background light and the yellow light had on the overall result. The flash with the red gel behind the model was pointed towards the white wall and made it completely red. There was some light from the yellow gelled flash hitting the flag and I tried to minimize that by repositioning the flash and zooming the head to give a narrower coverage. The black thing on the left is part of the softbox (turned off for this picture) and you can also see part of the reflector on the right. During the actual shoot with the president I had the softbox placed much closer to him and had him stand right next to the reflector.
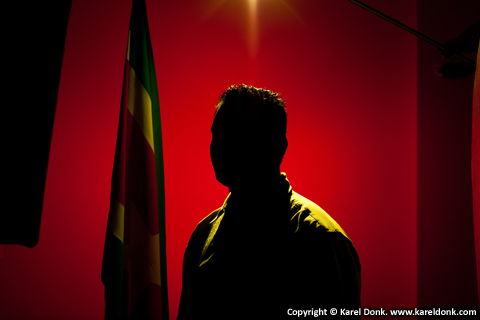
Test shot using my assistant as the model, just the red background light and yellow light on top
And of course in the end it all came together to create the final picture:
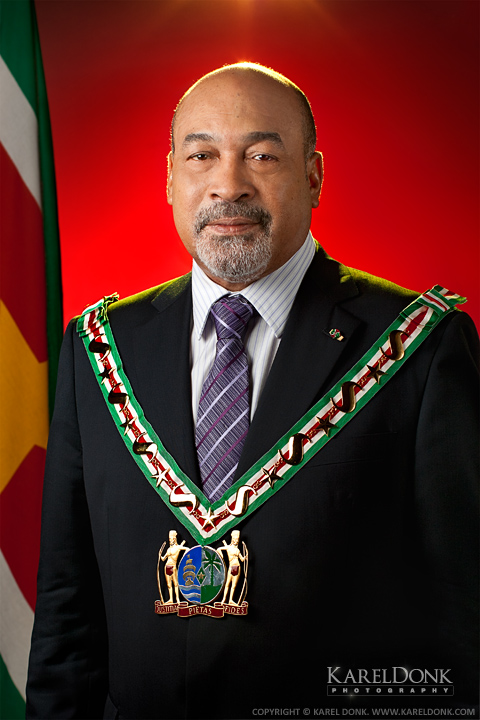
President D. D. Bouterse of the Republic of Suriname
The makeup for this photoshoot was done by Gillian Calor, and she did a very nice job. There was very little I had to do in that area in post production.
As I mentioned before, there’s a reason why I chose to use the above setting for this picture and that is to add some meaning to the end result. The president is standing against a red background that’s supposed to resemble the red color from the flag. The meaning of the red color in the flag is love and progress. The president resembles the yellow star in the flag, which is why he is lit by yellow light shining from above. The meaning of the yellow star is unity of all ethnic groups and a golden future. Before his election the president often mentioned how it was his dream to bring together the people in Suriname, all the different ethnic groups, unite them and have them all work together for a much better (golden) future for everyone. So by making him resemble the yellow star I think that this portrait highlights one of his most important goals, and further communicates the idea that he’s the one who’ll lead the nation to achieve that goal. And he will do this against the background of love and progress for everyone (red color). In addition the yellow light is shining from above, which adds a spiritual meaning to it. During his campaign the president often mentioned how he was being assisted by an invisible hand, and how a higher power was guiding the process of change in politics in Suriname. So by making the yellow light shine from above and making it rest on his head and his shoulders it resembles the help and guidance he receives from above during his term as president of Suriname for the following 5 years. The president wore a purple tie that day and I decided not to modify the color in post production. Purple is the color of the National Democratic Party (NDP), which is the political party the president comes from. Although the overall picture is mostly about Suriname as a whole, the purple tie adds a hint to the NDP in the final result. So in summary this picture shows that president D. D. Bouterse, with the guidance he receives from above and against the background of love and progress for everyone, will further strengthen the unity of the people in Suriname and lead them closer to the promised golden future.
I’m glad that they trusted me enough to give me a lot of creative freedom to do what I wanted to do. I’m also glad I really got the expression on the president’s face that I was looking for. I was worried that I would not be able to get the expression I wanted from him. Usually the president looks serious, neutral or cheerful. But I managed to get this very friendly look from him after trying for about 30 shots. Two shots later I was done. This look was important to me because it portrays him as a nice and friendly person, and hopefully it will contribute to his image in a positive way.
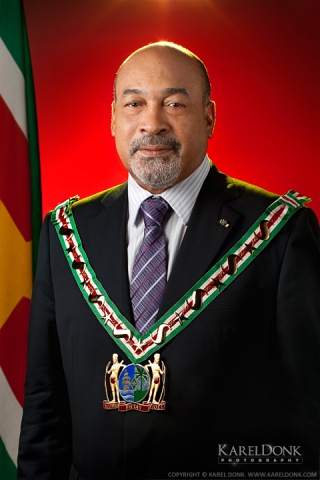
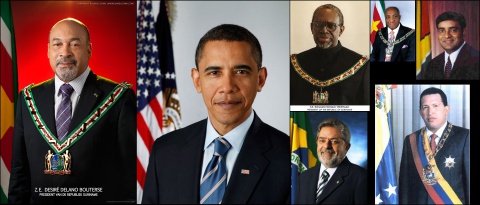
And finally I thought it was nice to see how this portrait compares to official portraits of previous presidents of Suriname and other presidents in the region:
UPDATE September 17th, 2010:
Yesterday David Hobby from Strobist.com linked to this post on his website, and I’ve been receiving a lot of comments and exposure as a result of that. I don’t think I have to say what an honor it is for me to be mentioned on Strobist.com. It’s one of the most important websites on the Internet as far as off-camera lighting is concerned, and I have learned a lot from all the information there, some of which I’ve used in the shoot I wrote about above. I even used the Strobist filter kit. I appreciate all the comments, the positive ones and also the criticism, I can’t reply on each and every one of them with a “Thank you” but I want to let you all know that I value all the feedback. Thanks a lot
UPDATE January 8th, 2011:
Radio Nederland Wereldomroep (RNW) interviewed me about taking the official portrait of the president of Suriname last year, and I’ve now uploaded an MP3 of this radio interview which you can download here. There was also a newsitem on their site, and you can download a PDF copy of that here.
UPDATE August 6th, 2016:
After 6 years I’ve looked back at my work in a new blog post titled “The Presidential Portrait; Looking Back.” I encourage you to go and read it; you’ll find that I’m not so proud of my work anymore as I once was. The difference between now and then? Knowledge, truth and awakening.

Comments
There are 160 responses. Follow any responses to this post through its comments RSS feed. You can leave a response, or trackback from your own site.